Skip to content

Hy-Gain AV-640 is a resounding success.

I’m VERY pleased with my Hy-Gain AV-640.  It’s mounted on a 15ft mast at the side of my single-story house.  I have a Kenwood TS-590s and I usually run 50 watts.

Today I was scanning 20 meters and I heard 4B4B.  That’s a DXpedition to Revillagigedo Islands (Socorro) in the Pacific. There was a small pileup but I punched the XMIT button and gave my call. He answered. About three weeks ago the same thing happened with F6KHM (France).

Both stations came back to me on my first attempt to make contact.  Coming from years of sub-optimal antenna configurations, this is a new experience for me. And I’m loving it.

AV-640 Vertical is working well

I have not had much opportunity to get on the air for the last week or so, but the Hy-Gain AV-640 vertical seems to be working well. Contacts in the past week:

F6KHM

VE7MTW

AI0M

I each case I answered their CQ and they came right back to me.

The contact with F6KHM was this morning during France’s REF contest.  It was the easiest DX contact ever.


AV-640 Vertical is Up

My Hy-Gain AV-640 vertical is finally up!

This article is really about the assembly and erection of the antenna.  I will cover my operating experiences in a later post.

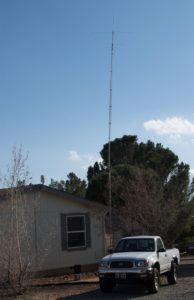
In the adjacent photo you can see it next to my house.  That’s my wife’s 2001 Toyota Tacoma in the photo (boy that is a great little truck).

First, this thing has a bazillion parts. A long time ago I had a GAP Challenger DX and this AV-640 seems like it has 20 times the parts to be assembled. And Hy-Gain is owned by MFJ Enterprises and has seemingly adopted the same policy of leaving the last ten percent of Quality Control to the buyer. Hoping to save some future buyer of the AV-640 some grief, here is a list of my discrepancies:

  1. Instruction Manual: Pages 10-15 , page number missing
  2. Instruction Manual: Pages 16,17 are numbered ‘1’
  3. Instruction Manual: Pages 19- end, page number missing
  4. Instruction Manual: Task VI refers to Figure G for mounting location of Matching Unit, It’s really on Figure H.
  5. Parts Bag #1, 705-1032S Should contain 10-32 nuts. They were 8-32 instead.
  6. 6 Meter stub 810-0640-19 incorrectly threaded.
  7. Hole in one Single Stub Insulator 737-8100 drilled too small

It’s amazing to me that I’m reading reviews that are several years old complaining of a mis-threaded 6 meter stub, and they have not corrected the problem. Having inherited my late father’s tap-and-die set, I ran a 10-32 die down the 6 Meter stub and corrected the mis-threading problem. The missing 10-32 nuts were no big deal except that it was a 50 mile round trip to Ace Hardware.

There are times during the assembly when a second pair of hands would have been helpful.  Specifically when adding the rods for the capacity hat and counterpoise. One pair of hands could hold the end of the rod into the rings while the other pair of hands tightens the screws/nuts.

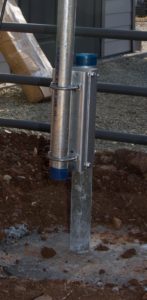
The footer is a concrete-filled hole that is 15×15 inches and 30 inches deep. The Hy-Gain support guy said that 2-3 cubic feet of concrete would be a sufficient footer, so mine is a little bit of overkill. The ground here is HARD. I could dig about three inches at a time.  I would then fill the hole with water that would take about 4 days to soak in.  Then I could dig another three inches. I therefore spent weeks digging the hole.

Embedded in the concrete is a 4-foot steel pipe that is 2 inches in diameter.  I then attached a Hy-Gain ATB-75 tiltover to it.  I’m getting too old to be climbing to high places to adjust antennas.  The AV-640 is mounted on top of a 15 foot mast that also is 2-inch diameter steel pipe.  The result is that the top of the antenna is at 40 feet.

Quick initial SWR measurements with my MFJ-269C analyzer:

7.2 mhz: SWR 1.4
14.1 mhz: SWR 1.8
21.3 mhz: SWR 1.5

I coud ‘easily’ tilt the antenna back to horizontal and tweak the 20M length but for now it’s good enough. (The tuner in my TS-590s seems to have no problem with it.)

Hy-Gain AV-640 Vertical Antenna Installation In Progress

Now that the VHF/UHF antenna is up, it’s time to start putting up the Hy-Gain AV-640.

Hy-Gain tells me that a footer of 2-3 cubic feet of concrete should be sufficient. I’m digging a whole about 18 inches in diameter and a little over 2 feet deep.  That will be 3.5 cubic feet of concrete.

The ground here is HARD and progress is slow. I can dig down about 3 inches.  Then I fill the hole with water.  It takes several days for the water to soak in.  Then I can dig another three inches. So far my hole is 16 inches deep.

Permanent VHF/UHF Antenna is Up

My permanent VHF/UHF antenna is finally up.

Antenna is a Diamond X200A mounted on a 10-foot mast.  As you can see in the adjacent photo, I have a 2-inch steel pip that is four feet long, with 2 feet of it set in concrete.

Attached to that is a Hy-Gain ATB-75 Universal tilt-over.  The 10-foot mast is attached to the ATB-75.

One difficulty of note:  The ATB-75 instruction say that you can use “tube bases or mast pipes up to 2 ¼” OD”.  They neglect to provide a minimum diameter. So I promptly bought a steel pipe 1.25 OD and set it in concrete, only to discover that the U-bolts on the ATB-75 would not accommodate a pipe that small.

AAAARRRRRRGGGGGGG! Yes, I know, I should have done a trial assembly before pouring the concrete.

I dug the pipe and it’s concrete out of the ground, Bought a 2-inch pipe and some more concrete, and after much cussing I was ready to continue.

From that point on the project went smoothly. The mast is also secured to the eaves of the house using a Rohn WM6S Wall Mount

I live in a small rural community in Arizona called Spring Valley, nestled in the foothills of the Bradshaw mountains. I keep the Wildflower Mountain repeater (145.350) on in the shack all the time and thanks to the broad coverage of it, I’ve made friends all over the state.

I Ordered a CrankIR

I ordered a CrankIR today.  I ordered the full 80M version even though I’ll probably never operate 80M with it.

My main motivation for the CrankIR is day trips up into northern Arizona.  My Sweet Lady Wife loves to get out of the PHoenix heat in the summer.  In the fall she loves to get up into the pines and see the fall colors.  I figure that I can haul and antenna, a battery, and the TS-590 up north, operate or a few hours, and meet her needs as well.

I have a second motivation (scheming here).  I live in an HOA with antenna restrictions. But I can have a flagpole!  I have the spot picked out for the ‘flagpole’.  As a test I’ll set up the CrankIR on that spot and see how it performs.  Mostly I want to make sure that when I operate I don’t make the TV go crazy (or my neighbors’ TVs go crazy).

Making Winter Antenna Plans

I’ve started making plans for some winter antenna projects. Of course, I’m in Phoenix Arizona, so our definition of winter is “The temperature allows for outdoor activities.”

  1. Get the raingutter antenna working again.
  2. Use the long narrow strip of vacand land behind my house to erect a beverage receiving antenna.
  3. Erect an end-fed 17M dipole anenna vertically-oriented in the tree in the back yard.

I’m also designing a shortened 40M vertical that I can hang from the tree but I don’t know if I wil get that far.

My Antenna Support is Down

treedownFor the past three years, the mesquite tree in my front yard has been serving admirable as a support for my VHF/UHF antenna.  It has not only supported the Diamond X50 vertical at a decent height, It has camouflaged it extremely well (I painted the antenna the same color as the tree trunk).

We had a huge windstorm last night and it blew the tree over. Tomorrow (Monday) I’ll call a tree removal service and then have a new tree put in.  It will be a few years before it can support an antenna however.

I live in an HOA with antenna restrictions (meaning ‘no antennas’) so I’ll have to figure out a solution.

Antenna Trimming Day

pic2
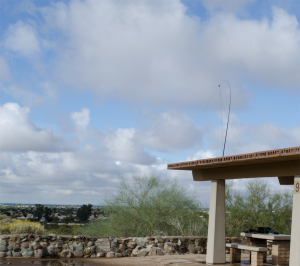
I built an inexpensive 40M dipole using a crappie pole as a mast.  Today was a great day to take it outside and trim it to the correct length. There is a nice little park not far from my house and so I set up there. The whole job was pretty simple thanks to my MFJ-269.

If you look closely, you can see that the tip of the pole is bent over from the weight of the antenna wires but it still worked just fine. I’d love to have a Buddipole but for now this gets me there for a fraction of the cost.

Back To Top